Most of my work is inspired by fashion, or at least design outside the culinary world. Yet people always ask me to make a cake that looks like their purse. Why do you want to eat your purse! This blog can be a learning tool for you and an outlet of self expression for me:) No more purse cakes! Enjoy!
Showing posts with label painted cake. Show all posts

Saturday, May 10, 2014

To Margaret...my hero


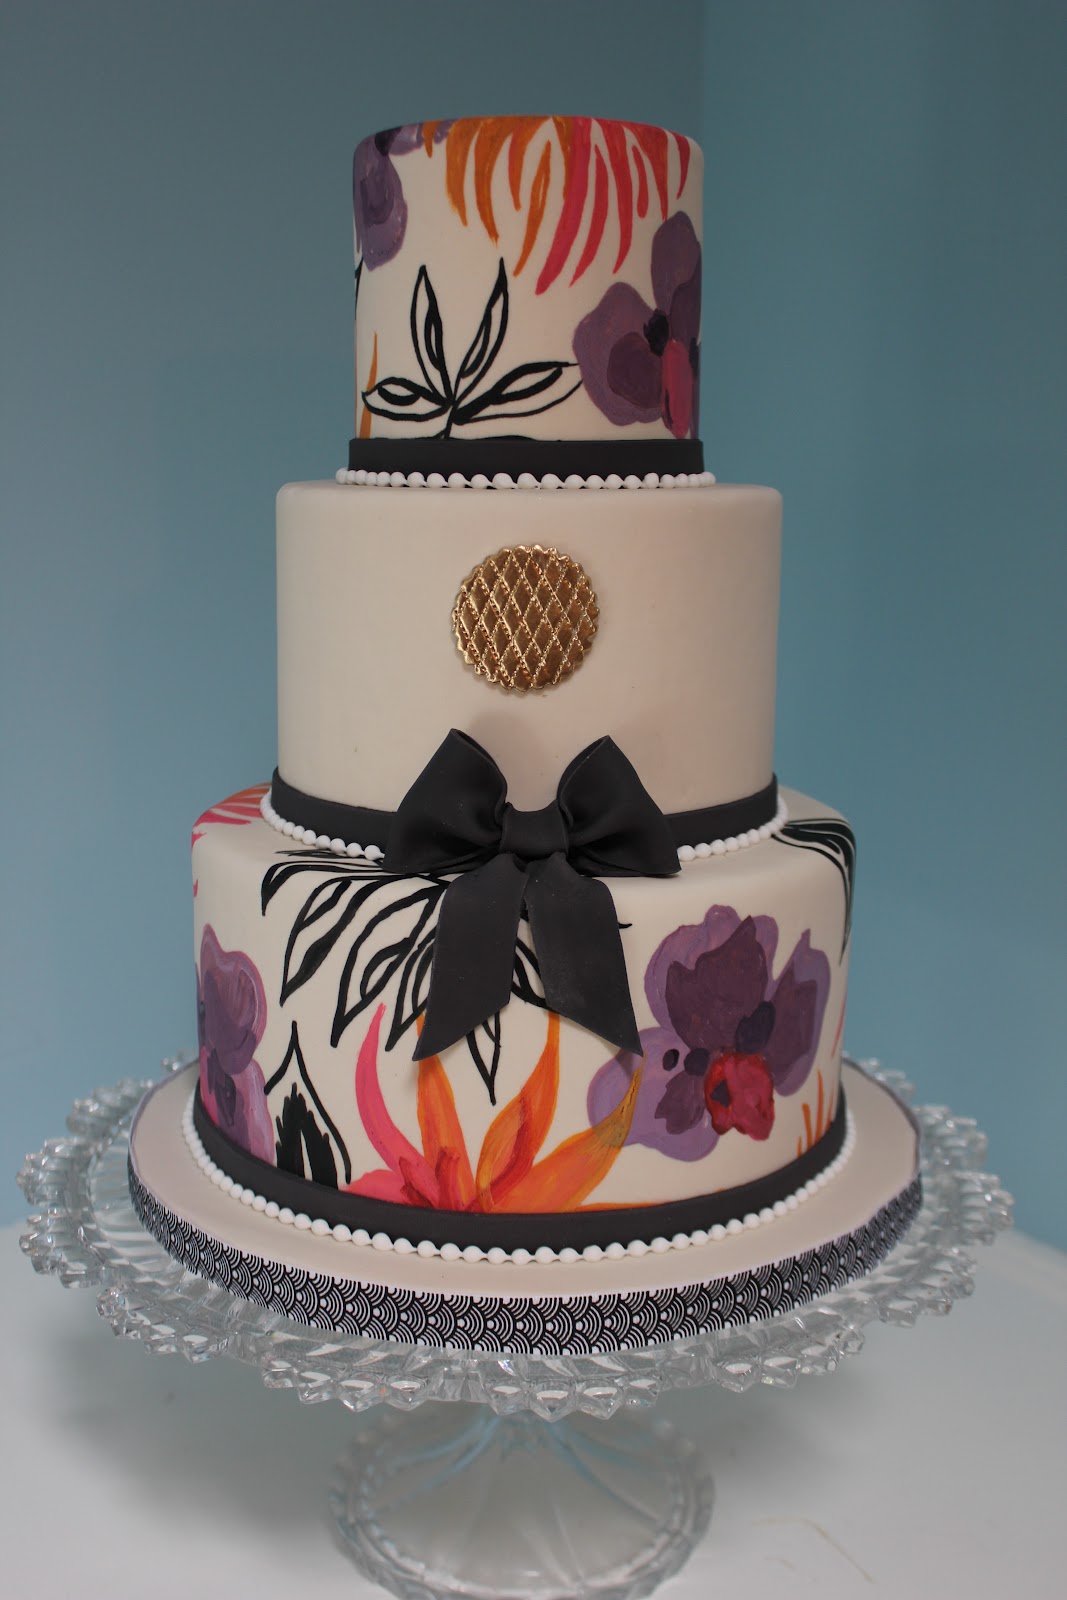
The picture above is a cake I made for my cousin Jenn's wedding....look familiar?  It was based on Baroque in Patent Leather, a cake that graces the cover of this beautiful, inspiring, and (at least for me) life changing book.....


I made Jenn's cake when I was a baby cake designer.  I was living in New York at the time and was totally obsessed with the woman I call my hero.....Margaret Braun!  If you don't know who Margaret Braun is....first of all....shame on you!...and secondly...she is the woman who changed my life.  I know that sounds dramatic, but it is true.

In 2002 (I was in college a the time), I found this book.  I must have read the book 100 times in the first week.  I was consumed with ideas and found myself practicing my piping skills everyday.  I would tape a piece of parchment paper to my dorm room wall and practice over and over using toothpaste.  What?  Listen, I was a poor college student and toothpaste is cheap....and it actually looks and pipes like royal!....but you have to get the super cheap, pasty kind.

Now, 12 years later.....here is what my book looks like today....


She's been through it....just for the record, I eventually bought another copy so I could try to preserve what was let of this one.....because it is SIGNED!!


...and yes...I have had many, many adventures in sugar!  She signed my book at a demo at Macy's in NYC.  As a young cake designer....it was one of the best days of my life.  So naturally, much of my early work looked very Margaret-like......


God this picture is old!  Sorry for the quality..I think I used a disposable camera.  

The best thing about Cakewalk, is that it taught me to be fearless and try to push the limits of cake design.  It gave me chance to understand the importance of detail and develop my own style!  This is when I understood that MY cakewalks were the fashion shows, magazines, and pop culture I loved to obsess over.  I started to pull inspiration from everything around me.

Okay enough about me....let's talk about the work.   Here are a few of my favorites from Margaret...


Seriously, she even managed to reinvent the polka dot!


   Chalice toppers are a signature Margaret statement.


I love this fashion cake by Margaret....


Gorgeous!  It was inspired by Italian designer Rene Caovilla....check out this shoe he designed...


This is everything!...cake inspiration for days!!

And we can't forget her movie work...

Meet Joe Black


Bride Wars


And this showstopper from Rachel Getting Married....


That could not be more awesome!

A couple weeks ago, a friend asked me to create an over the top baby shower cake....something that didn't scream BABY!  Ha....so no blocks or strokes.  I was looking though my fashion archives and realized this was the perfect time to pay respects to the woman who I have always looked up to!

Margaret is known for her sculpted tiers, hand painted cakes, and signature cake toppers.  I have to get all three things on this cake.....and my added touches with some fondant texture.

I started by sculpting the top edge of each tier...


I run my knife along in a wave pattern.  Then I coat the cake in white chocolate ganache.


I know...it looks funny....stay with me...

Next I smooth the ganache, cover in fondant, and use my fingers to pinch and define this top edge.


I add some texture...you guys have seen this before in my Stella McCartney cake....

It's time to paint....


I am using pink food coloring, white to tone it down, and then a lightly damp craft sponge to wipe the color off.


I paint color into the lines....


Then I use the craft sponge to wash the color over the surface...


I added some embellishments.  Once again....it still looks a bit crazy...stay with me;)

Let's talk about the topper.  I need to make an ode to a chalice without actually making a chalice.  I am gonna try to make a golden rattle.  I start by making a chocolate piece from my Pavoni mold.  It needs a hole though so I can feed it through the dowel.  I am gonna use a bubble tea straw.


I dip the straw in chocolate...


Place it into the top of the mold and hold it to dry so it remains level....


Then I popped the top off and filled the mold with chocolate....


Okay I got a couple air bubbles but I'm gonna gold leaf this thing so it won't matter.....


The cake is stacked and ready to paint....


With the middle tier I wanted to add some polka dots but in a different way than Margaret does them.  So I gave them some texture...

I also added some bows based off this cake Margaret made for Puff Daddy's baby shower....


It's coming along!!  Here is the finished topper....


I just continued to paint until there was nothing left!!!


And here she is all together....


Yay!  I love her!  And she made it on TV!.....


The cake was for Kim Z. from Don't Be Tardy on Bravo!  I also got the chance to meet Margaret again in person!


Here was my cake from her class.


I would like to send a huge thank you to Margaret Braun for being my hero, giving us this amazing book, and allowing me to do this blog post.....because....by the way....Margaret is super down to earth....watch this Master Class....


That's all for now;) Bye!!


Thursday, May 31, 2012

Cake Spade;)


Every year when my sister's birthday comes around, there is only one store I go to for a gift....


Oh yes....my sister's favorite....Kate Spade!  I fell in love with this store the first time I walked in.  The store itself is a color haven for any type of designer.  Oh and she captured my heart with this piece.....


Yes Ma'am!! 

Soooooo....I my very first Fashion Caker post will be designed around the beautiful style and grace of Mrs. Kate Spade!

The problem is that I want to do everything!!!  But I decided to self edit and found this dress as my perfect inspiration.....


Something about the colorful and beautiful chaos of this pattern draws me in.

The way I design is much like that of Kate.....or any other fashion designer....I start with inspiration and a sketch....


 Now this is just a start.....I always end up changing something.  That's the beauty of design:)  Especially, if you are not filling an order.  In that case, I would encourage you to stick to your original plan....you know, so you don't get punched by a bride!

So here is what you will need for this project....

  1.  Three cakes (real or dummies)...round, 8", 6",and 4"
  2. Fondant (I used a creamy color....about 5 pounds)
  3. Black gumpaste (for detail work, could be fondant with a little Tylose)
  4. Gel colors (including white)
  5. Paint Brushes (various sizes)
  6. Piping bag with #1 tip
  7. Royal Icing (less than 1/2 cup)
  8. Ribbon cutter
  9. 10 inch round cake display board
  10. Ribbon to cover the edge of the display board
  11. Scissors
  12. Gumpaste quilting tool

Okay the first thing is to cover your cakes in fondant.  Side note....as I progress through these blog posts, I will be going back and showing you how to do some basic things like fondant work...so no worries.

The bottom and top tiers are the one that will receive the print so let's do those two first.

Now we have to mix up colors for the print....

This is red and blue with a touch of white to lighten....


And as you paint the design, use vodka to thin the food coloring gel a bit, to paint with ease.

There are no stencils or cutouts for this so it will have to be freehand.  I am going to start with the purple flowers first....


 I make the outline in a medium purple and then fill it in...


Next, I add the pink center....


And some darker spots in purple...

So it should look like this, give or take a few flowers....

Now that we have our framework, let's paint the orange and pink motifs next...


I do this the same way....outline and then fill in.  BTW, it doesn't have to be perfect....that's why I chose this print...use your own imagination:)


Now we can add the black leaves and plants......I just doodled!!


Perf....

Do the same to the top tier and we are good to go....


These could be cakes on their own...

 Look at that little nugget...

Okay now let's stack them....


We are going to leave the middle tier simple.  One thing I love about Kate's style is that her pieces are simple and chic...not fussy....and timeless....

The cakes need boarders.

Let's line each with a thin black gumpaste ribbon to make the colors pop!


So I'm just rolling out  a long strip and using my ribbon cutter to make consistent lines.  Then I stick them to the cake with a little piping gel (or water).

Okay....design change....see...I told you! 

Here is the original...

 This is too busy for Kate, and the spade is way to big!

I am gonna move the bow to the middle tier and make a smaller spade.

Here's how to make a bow....

First you want to roll out a thin piece of gumpaste (about 6 to 7 inches long)


Then cut a strip about 5 to 6 inches long (you can use the ribbon cutter here too), and chop off the ends....


Add a little piping gel to the center....


Starting at one end, fold the two corners in towards the bow....


And then pull them back towards you....


Smush it into the piping gel and do the other side...


Squeeze the middle and add a center strap....


Then I like to pull the top pieces together a little, especially since this will sit on the middle tier.

Now for the tails, you want to make another strip and cut it diagonally...


Then we place a little piping gel where the bow is going to sit....


Then add the tails....


Now add the bow...


Yay!  We could just leave it like this....


But we need an ode to Kate!...and a little piping....

So using a cutter (your choice) I made this little guy and gave him some detail with the quilting tool.....


Now let's paint him gold....


I also piped a small bead boarder in white....


Looking great!  Here is where the spade comes in....I cut a tiny one to fit in my little gold coin...you can use a cutter for this if you like...


Okay we need a little more gold...

I mix up some Gold Highlighter with vodka to paint the pearl boarder...


And I think that should do it!!!  Let's see!


I think Kate would be proud!!


That's all for now.

Thanks to Kate Spade for all of your beautiful designs!