

Oh yes....my sister's favorite....Kate Spade! I fell in love with this store the first time I walked in. The store itself is a color haven for any type of designer. Oh and she captured my heart with this piece.....

Yes Ma'am!!
Soooooo....I my very first Fashion Caker post will be designed around the beautiful style and grace of Mrs. Kate Spade!
The problem is that I want to do everything!!! But I decided to self edit and found this dress as my perfect inspiration.....

Something about the colorful and beautiful chaos of this pattern draws me in.
The way I design is much like that of Kate.....or any other fashion designer....I start with inspiration and a sketch....

So here is what you will need for this project....
- Three cakes (real or dummies)...round, 8", 6",and 4"
- Fondant (I used a creamy color....about 5 pounds)
- Black gumpaste (for detail work, could be fondant with a little Tylose)
- Gel colors (including white)
- Paint Brushes (various sizes)
- Piping bag with #1 tip
- Royal Icing (less than 1/2 cup)
- Ribbon cutter
- 10 inch round cake display board
- Ribbon to cover the edge of the display board
- Scissors
- Gumpaste quilting tool
Okay the first thing is to cover your cakes in fondant. Side note....as I progress through these blog posts, I will be going back and showing you how to do some basic things like fondant work...so no worries.

The bottom and top tiers are the one that will receive the print so let's do those two first.
Now we have to mix up colors for the print....

This is red and blue with a touch of white to lighten....


And as you paint the design, use vodka to thin the food coloring gel a bit, to paint with ease.
There are no stencils or cutouts for this so it will have to be freehand. I am going to start with the purple flowers first....

I make the outline in a medium purple and then fill it in...

Next, I add the pink center....

And some darker spots in purple...

So it should look like this, give or take a few flowers....
Now that we have our framework, let's paint the orange and pink motifs next...

I do this the same way....outline and then fill in. BTW, it doesn't have to be perfect....that's why I chose this print...use your own imagination:)

Now we can add the black leaves and plants......I just doodled!!

Perf....
Do the same to the top tier and we are good to go....

These could be cakes on their own...

Okay now let's stack them....

We are going to leave the middle tier simple. One thing I love about Kate's style is that her pieces are simple and chic...not fussy....and timeless....
The cakes need boarders.
Let's line each with a thin black gumpaste ribbon to make the colors pop!

So I'm just rolling out a long strip and using my ribbon cutter to make consistent lines. Then I stick them to the cake with a little piping gel (or water).
Okay....design change....see...I told you!
Here is the original...

I am gonna move the bow to the middle tier and make a smaller spade.
Here's how to make a bow....
First you want to roll out a thin piece of gumpaste (about 6 to 7 inches long)

Then cut a strip about 5 to 6 inches long (you can use the ribbon cutter here too), and chop off the ends....

Add a little piping gel to the center....

Starting at one end, fold the two corners in towards the bow....

And then pull them back towards you....

Smush it into the piping gel and do the other side...

Squeeze the middle and add a center strap....

Then I like to pull the top pieces together a little, especially since this will sit on the middle tier.
Now for the tails, you want to make another strip and cut it diagonally...

Then we place a little piping gel where the bow is going to sit....

Then add the tails....

Now add the bow...

Yay! We could just leave it like this....

But we need an ode to Kate!...and a little piping....
So using a cutter (your choice) I made this little guy and gave him some detail with the quilting tool.....

Now let's paint him gold....


I also piped a small bead boarder in white....
Looking great! Here is where the spade comes in....I cut a tiny one to fit in my little gold coin...you can use a cutter for this if you like...

Okay we need a little more gold...
I mix up some Gold Highlighter with vodka to paint the pearl boarder...


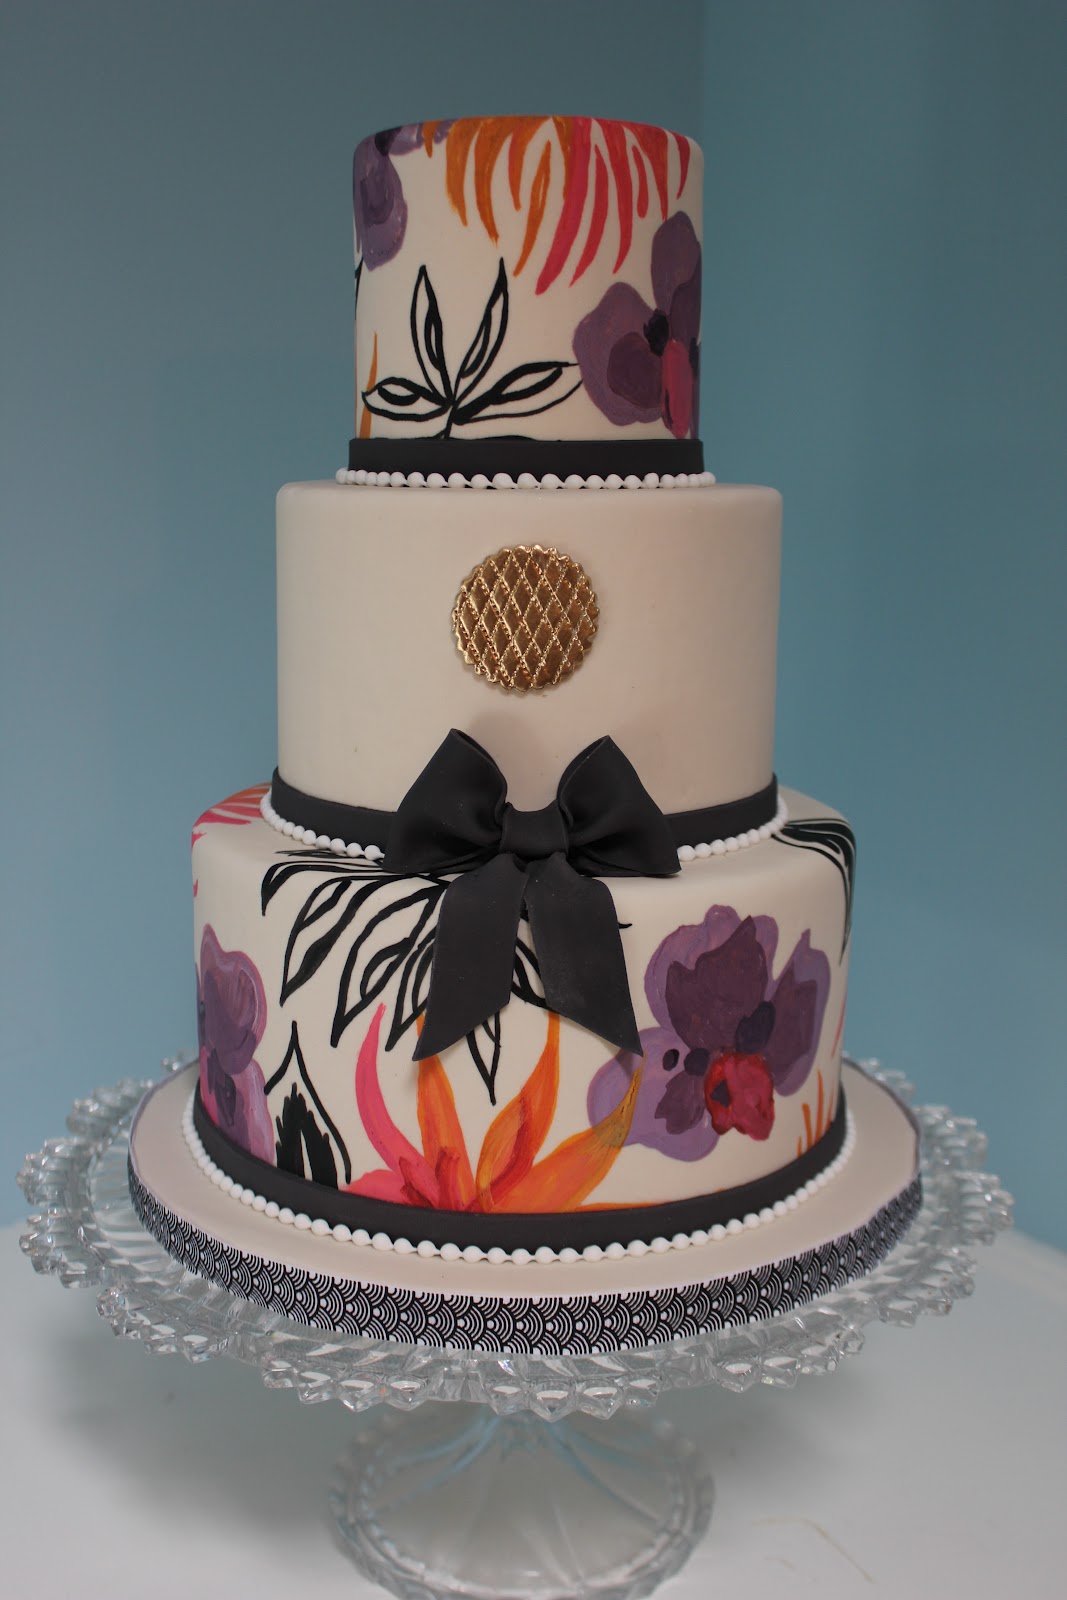
And I think that should do it!!! Let's see!


I think Kate would be proud!!
That's all for now.
Thanks to Kate Spade for all of your beautiful designs!
