So the cake above is one I created for Kim Zolciak's daughter. The party was candy themed and the cake was super fun to make. It has rainbow sprinkles, lollipops, gumdrops, gumballs, Starburst, Skittles, and Fruit Stripe Gum. Talk about a belly ache!!
I did not take process pictures for the cake:( So when I was asked to make a 21st birthday cake for a friend I wanted to make a similar style cake. This time using art as inspiration and I knew just the thing!
I was in NY a couple years ago and stumbled upon this amazing building....
It's called The New Museum and the building caught my eye because....well, it looks like a cake!!
Here's a little bit of Wikipedia....
The New Museum of Contemporary Art, founded in 1977 by Marcia Tucker, is the only museum in New York City exclusively devoted to presenting contemporary art from around the world. On December 1, 2007, the New Museum opened the doors to its new $50 million location at 235 Bowery. The seven-story 58,700-square-foot facility,[9] designed by the Tokyo-based firm Sejima + Nishizawa/SANAA and the New York-based firm Gensler, has greatly expanded the Museum’s exhibitions and space. In April 2008, the museum's new building was named one of the architectural New Seven Wonders of the World by Conde Nast Traveler.[10]
The thing I was most intrigued by though, was the sign!!.....
The giant rainbow "HELL, YES" made me giggle and I had to find out where it came from.
This hilarious creation comes from Swiss artist Ugo Rondinone. He is definitely one to Google! Here are some other pieces he created....
Aaaahhh!! How cool is that! Rainbow/Candy cake it is!!
I wanted to start with a base that the colors would "pop" from. So I made this grey color for the fondant covering.
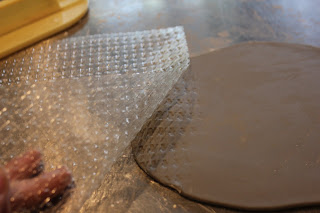
The bottom tier will be mostly about the rainbows! They are the star of the show. But I need a little texture. You know how I love my texture mats!!
Hounds tooth? Yes!! I like to roll out a bit of fondant and make a test before committing to the cake.
Yes. This is it. Just a note....when you are using the texture mats, take your time!! If you use them slowly and carefully make sure every bit of the fondant is being imprinted, then the final product will be much better than a rushed job!
I like to use the fondant smoother first and then go back over the mat with my fingers to make sure every detail is imprinted.
Beautiful! Let's make the rainbows. This is so fun!!
First I make all of my colors from fondant and add some Tylose to ensure the rainbows will dry and be firm enough to stand up.
Now we just roll, cut, and layer using the oval cutter set from Ateco.
I glued each layer with a bit of piping gel. You could use water, sugar flower glue, or royal icing as well.
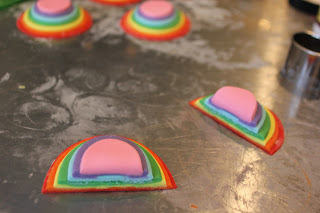
Now I chop them in half....
....and use the smallest oval cutter to take out the middle and form the arch.
How cute is this! I painted over them with a bit of piping gel so they would look shiny and bright against the flat grey color. This could be a cake by itself!....but I think we need more!! Two more tiers....
I stacked the cakes with bubble tea straws.....this I have shown in the previous post for Kim Z's wedding cake replica.
Oh and the rainbow sprinkle base is super easy! All you need is the drum, piping gel and a ton of sprinkles....
Brush the gel over the base....
...add the sprinkles....
...shake off the excess...
You can use a funnel to get the sprinkles back into the jar for later use.
Then I add a little chocolate to glue the bottom tier to the base. Notice that the middle of the cake base has no sprinkles! This is because we want the bottom tier to me glued to the base and not to the sprinkles!
and now for the Skittles. Yes, I had to separate them by hand!
So this is super easy. I just used piping gel and placed them one by one in a pattern.
Yay!!
For the top tier, I just used the left over rainbow colors to create stripes with a ribbon cutter.
And that is not all. So my friend has a really good since of humor and we teased her about turning 21; that it's the one day in your life (we at least for an American) were everyone wants to by you drinks and get you really drunk. So her friends ask if I would write something on the cake that suggested that she was going to throw up. Lol.
I found this funny clip art and figured it was appropriate for the theme and inspiration....
I couldn't resist!!!
Here's a couple other silly cakes I did in the past....
This giant Nintendo controller was a grooms cake and so much fun to make!
Angry birds!
M&M...now this is a candy cake!
Lady Ga Ga cake! Talk about a fashion cake!
Well I guess the Wicked cake was more whimsical than silly. But it got me tickets to opening night!
And lastly.....I taught a class this weekend at my friend Nicholas Lodge's school, ISAC and just wanted to share some photos.
My students were great and we had a fun two days together....
Here is my cake that the students were recreating.
And here are some action shots of the students work...
They all did so well!
That's all for now!
If you want more updates, follow me on Facebook, Instagram, or Twitter. And don't forget to follow the blog for more tutorials.


.JPG)


thats amazing josh!! you are one talented baker! miss you!! so proud of everything you have accomplished!!
ReplyDeletejordan
ReplyDeletejordan shoes
Golden Goose Deluxe Brand
kyrie irving
golden goose outlet
bape shoes
kyrie 9
off white t shirt
off white hoodie
kd 13
I love how creative and colorful this cake is!
ReplyDelete