Most of my work is inspired by fashion, or at least design outside the culinary world. Yet people always ask me to make a cake that looks like their purse. Why do you want to eat your purse! This blog can be a learning tool for you and an outlet of self expression for me:) No more purse cakes! Enjoy!

Wednesday, September 4, 2013

Rami Al Ali

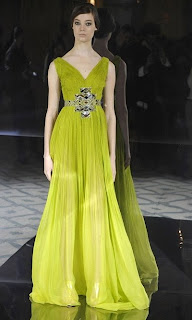
This picture says it all!!  The detail and craftsmanship of this man's work is incredible!

Recently I was asked by CakeCentral to create a cake for their fashion issue (volume 4, issue9) inspired by the work of Rami Al Ali.  Now I have to admit, I didn't know much about this designer, but I did my homework!  This Syrian born artist didn't get his start in fashion....that's the most intriguing part.  Let's see what Wiki says....


Due to the lack of opportunities in his small town for career growth and industry exposure, Al Ali moved to Damascus and joined the College of Fine Arts in 1991 to study Visual Communications. This led to his experimentation with creative pursuits, excelling in subjects such as interior and graphic design. In 1995 Al Ali’s decision to design and produce a fashion show for his final graduation presentation astounded his professors who were impressed at his portrayal of fine arts through fashion despite his deviation from the assignment.


Here are some of my favorites...

This is everything!!

 Everything!!!

 And everything....


Okay so I love his work!

This is a short from his Autumn/Winter collection for 2012/13....


Here is the dress I was assigned....


What's the plan?  Well I love the dress and the possibilities are endless....ombre, structure, draping, beading, geometric patterns!!!  There is so much.  I don't want to go to literal with my interpretation though.  I need to pull one dramatic concept from the piece and then try to tie in elements of my work and other works in the collection.  This is cake after all....and I want it to look like a cake...not a garment.

I didn't start with a sketch.  I just let my hands and brain figure it out.

I began by adding some texture to my fondant with a gumpaste tool...


I just run my tool back and forth over the surface of the fondant....careful not to push too hard!  You don't what to cut through....just leave the pattern.

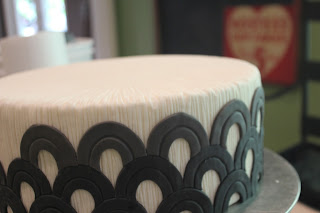
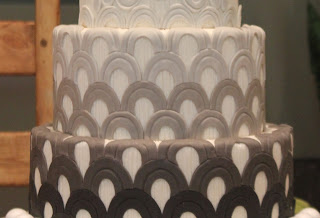
I decided to create the ombre pattern on the skirt of the dress....but in a different way.  I will invert the pattern and use some piping to enhance the look.


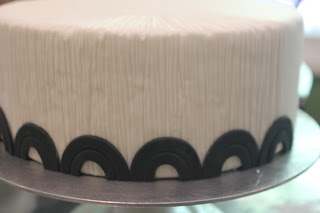
Starting with the darkest color at the bottom, I cut some black ovals.


I used the reverse side of the cutter to add an imprint and then cut them in half.

It's important when you are doing this sort of hand work to use a straight edge to line everything up and make sure it is even.


I placed them one by one with piping gel.


Now I did the same thing with a lighter color.  Instead of cutting them in half, I cut them on a curve using the same cutter so they will match up evenly.....


Here's the idea...
 
Looking cool:)))
 
 
Now I add some graduated pearls over the pattern for drama....


then a black band and some bling...


...and this little flower:)


Now the inside of the flower was made with gumpaste balls rolled in sanding sugar mixed with sparkle....


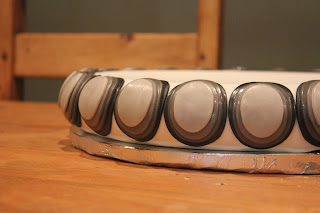
I also created with base tier with oval cut outs to resemble a bracelet.


Okay here she is.....
 

The cake is fine....but not for me.  I need a wow factor!!  It need color!!

I looked through his collections and found my inspiration in these two looks....


I love that color.  So with a little food coloring and experimenting, I had the look I wanted...

Here she is again;)....

 
Ta da!!  NOW I love her!  Here are some other shots....


Sweet!  Don't forget guys, I am coming to Dallas in October, Canada in November, and Philly in December!!  Click the links below for more information!


That's all for now.  Leave your email at the top right to subscribe and receive updates.  And you can follow me on Facebook, Twitter, or Instagram.
 
 
Bye!!
 

Wednesday, August 21, 2013

Oh Chevron!!


Oh the chevron craze.  It seems to be at an all time high.  And I am okay with that.  I think it's chic and fun at the same time.....as long as you don't over do it!

Here is what Wikipedia has to say about the insignia....


A chevron (also spelled cheveron, especially in older documents) is an inverted V-shaped pattern. The word is usually used in reference to a kind of fret in architecture, or to a badge or insignia used in military or police uniforms to indicate rank or length of service, or in heraldry and the designs of flags (see flag terminology). The symbol is also used on highway signs to guide drivers around curves.

And you thought it was started on Pinterest;)  It's actually more symbolic than you think....like signifying rank....


In today's world of design, however, chevron is everywhere!!

Home décor....

 
This comes from my friends company!  DENY Designs...they have some really cool stuff.
 
Cell phone cases....

 
Gas....lol


Even hair!....
 
 
Check out this awesome chevron look from Tom Ford.  I love this!!


I love this vintage fashion piece as well....from McCall's magazine in the 60s


A couple of weeks ago, I was asked by my good friends at Sashay Events here in Atlanta, to be part of a wedding spread to be photographed for editorial purposes.  My favorite!!  I jumped at the chance.
 
 
I can't reveal photos from the shoot at this time.  But once the pictures have been published, I will post them.  I can, however, show you a demo from one of the cakes I created for the shoot.  And guess what....I used chevron;)
 
The theme was Gatsby in the Garden and I knew I wanted to do something structured and organic at the same time.  I pulled some inspiration from Jessica Harris' Craftsy class....
 

It's a great class!  Here are some pictures of her work....


Pretty good right?  She really has a great eye for design and all of this is done by hand!

Obviously I am not going to show you her process, you will have to buy the class......it's well worth it!  But I will show you the product I used to get the chevron effect.

They are called Silicone Onlays and are the latest creation from Marvelous Molds.  Now the company has video tutorials on their site and YouTube.....but I'm gonna show you through pictures.


So they come in many different styles and patterns and they are super easy to work with.  Here is the first practice one I made with the Moroccan lace onlay.....
 

It came out pretty good.  You are told to use gumpaste because it is firmer than fondant.  But I did this one with Fondarific and it was fine.

First you have to roll a strip that will fit the size of the mold.  I used the pink roll guides on the Wilton set or you can take it down to a 4 on a pasta machine. 


You place the strip over the onlay (it's good to dust it with a bit of cornstarch first), and press the paste in with your fingers.

 
Then I took a cell pin and gently rolled it over the Onlay until I could see the green edges thought the paste.  This is how you know that the lines have been cut.


I paint the back with some piping gel.


I used a needle tool to take out the excess pieces to get the negative space.


Then secure it to the cake.


I also used light pressure with a fondant smoother to secure the paste.


 Pull away and you are done.

 
 You can see the tiny starting line.  That's because I pressed a bit too hard!
 
 
You could do it this way too....


 I also went back and painted every other one gold.

 
Okay....now we have the structured part.  We need something organic.
 
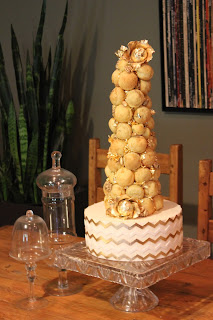
A friend of mine Alexandria Pellegino from Cake Opera Co. gave me this inspiration!  Her work is remarkable.  Here is the piece that I was inspired by....
 
It's the blue one.

I'm gonna build a croquembouche! Here's what Wiki says....

A croquembouche or croque-en-bouche is a French dessert consisting of choux pastry balls piled into a cone and bound with threads of caramel.
In Italy and France, is often served at weddings, baptisms, and first communions.

I learned how to make this in college.  But I am going to break the rules a bit.  Because this is a photo shoot and not for a real party, I am going to leave the puffs empty so they will not be so heavy and glue them with white chocolate.


I add them one at a time to the cone.  Also, I coated some nuts in gold and used gold leaf to fill in the gaps.


and then a couple gold gilded flowers for some drama!


And here she is....


Yay!! 

I am coming to Dallas to teach in October here are the classes and the links.  It's three classes over two days for $800 or you can take the full day for $400 or a half day for $200.  It's a pretty good deal and it will be lots of fun!! 


This class will explore different styles of modern decorations (fashion inspired of course) including the same style flower I made in this post!


The Gothic Glam class is a take on A Cake Fit for McQueen.  We will hand make the skull and hand cut the bone work on the top tier...then piping!!


Lastly, this class will explore how to make your own template for a framed plaque.  We will also be adding texture and piping!!


That is all for now.  Here is a link to Marina Sousa's new class on Craftsy.  It's really good!!


Don't forget to follow the blog for updates.  Bye!!