Most of my work is inspired by fashion, or at least design outside the culinary world. Yet people always ask me to make a cake that looks like their purse. Why do you want to eat your purse! This blog can be a learning tool for you and an outlet of self expression for me:) No more purse cakes! Enjoy!

Tuesday, July 23, 2013

Faberge Spider Cake


For some reason I gravitate toward images that are hauntingly beautiful.  Maybe that's why I love Alexander McQueen so much.  But there is another designer whose work fascinates me.....Gareth Pugh.  Here is some of his other work....


Trust me, there will be a blog post on his designs in the near future.  I am showing you this because the theme is where I drew my inspiration for my latest cake.

I was asked by Cake Decoration Heaven to create a cake inspired by the Autumn season.  I immediately wrote back and asked if I could make a cake with Halloween in mind.  They agreed and let me go crazy.

So what to make?  There are a million different ways to portray Halloween.......

Cute....


No...too cute....it's not right for this.


Elegant....


Okay this is nice.


Creepy....

 
Aaah!  I think this baby is drunk.


Funny....


See baby....this is what happens when you drink too much!;)


Down right scary....


These pumpkins were created by Ray Villafane.  He is a master sculptor and his work is amazing!  But I think this is too much for my project!

And lastly.....there is always Halloween the Martha Stewart way.....

Girl you got a bug on your face.

But speaking of bugs, this is were I found my inspiration!!

I remember watching an episode of America's Next Top Model a few years back.  The models were asked to walk the runway wearing jeweled studded hissing cockroaches!


Yikes!  The bottom picture is an ornament but the one that the model is holding, is real!  It was a trend for a minute or two, created by Jared Gold and sold for $80 a pop.  I'm not sure I would pay $80 for a roach......especially since I kill them for free!

Okay all joking aside, I decided to created an elegant (Martha Stewart worthy) cake using a spider.


I started by creating the spider from gum paste.  I formed the body and head and all of the leg joints separately.  This way, I can secure her to the cake in any way I want.


I decided to cover the top and bottom tiers in white and clear sprinkles and sanding sugar to give the cake a glistening effect.


And the middle tier, was crazy!!  Why I chose to do this.....I have no idea!!!


Ugh, so it came out great, but took a really long time.  I used an extruder and gum paste to pipe out all of the pieces and then wind them around each other forming this cool design.  For a real cake, it's not practical.  But for editorial work, it's super dramatic!!! 

Now let's start on the spider....


I began with the front....gluing the body, head, and the first two legs with white chocolate in a paper cone.  I placed her arms like this for a reason.....you will see in a bit.


 Here is a closer view. 


So on and so forth until the whole spider was on and secure.  Chocolate is a must for gluing her down.  If you use royal, you will have to hold or brace each piece while it dries.  That would take a longer time than you want.


Here she is all together. 


Now I want to make it look like the spider is decorating the cake.  So I am going to add some string work.  And by that I mean I will take a 2.5 PME tip and pipe a ton of strings on top of one another to give an ode to the spider's web......


It came out pretty cool.  I want it to pop though, so I will paint the strings gold.  A spider that spins gold?.....what could be more elegant?;)


I also added some detail work on the spider including a jewel on her back and some piped pearls....


Now here is where my OCD steps in.  I wanted to give the editor options so I took final shots in white....


Then in green....


And again in black....


Now you can see the strings up by her hands.  I placed them that way to give the illusion that she is decorating the cake.

So the magazine is out and I am thrilled to have a two page spread.....complete with step by step instructions.  Click the cover to download a copy.....it's reasonably priced and the issue is full of ideas!!


Oh and here is some super exciting news!!!  I will be featured in the next issue of Grace Ormonde!!  I have dreamed of being in that magazine since I was in culinary school.  It hits news stands in February.


Okay the picture is super small but I am just grateful to be included!!  Here is a larger shot of the cake that they used....


Yay!  When I got the email I almost died.  They also decided to use my McQueen cake for their June digital issue....


Double Yay!!

So don't forget, if you want updates, subscribe to the blog on the right side of the screen.  That toolbar is where you can find links to my classes on Craftsy.  Also, you can follow me on Facebook, Twitter, Pinterest and now Instagram.

Here is my latest Instagram pic....


They are homemade Oreo ice cream sandwiches!!  What??!!

Thanks to Cake Decoration Heaven for including me in the magazine.....and allowing my personal creative freedom.....and to Grace Ormonde for fulfilling a childhood dream.  And to Craftsy for letting me be part of the family!!

Oh and feel free to leave comments with questions or other ideas you would like to see.

Last thing... here is a fun cake I made a couple week ago. 


That's all for now!


Wednesday, June 12, 2013

Burlap Bow Tie


Recently a friend of mine asked if I would create a cake for a baby shower to welcome a sweet little baby boy named Hudson.  Great name!  The best part was that the baby shower was to be super chic and adult.  And by that I mean....no diaper games! Ha. 

She wanted me to be creative and sent these pictures for inspiration....


Love it!  Burlap it is!  And oddly enough, I came across this burlap bow tie in my fashion research, some time ago, and fell in love!!  I knew at some point I would be making this out of sugar.  This cake is the perfect opportunity!


Here is another one I found...


Right on top of a bottle of wine....that's my kind of fashion;)  Lol.

But seriously burlap isn't just for potatoes or sack races anymore.  Here is a hip burlap clutch from Etsy.com


And how about this burlap look from Donna Karen's spring 2010 collection...


I wonder if she's itchy;)

Project Runway even created a challenge that required the designers to use burlap to build a runway look.  I loved this one.


Super cool. 

The only way I could think to get a good textured look though was to pipe!  Sounds like a ton of piping.  Actually it wasn't so bad.

First I had to make my burlap colors. 


I decided to use antique white Fondarific and tint it using cocoa powder.  I like to use cocoa when making brown colors because the less food coloring I can use, the better.

Once I had my color, I added some tylose to a bit to make the bow.  This way the bow will dry firm and it will keep it's shape.

I have shown the bow process before in my Cake Spade post.  This time however, I made the two pieces separately because I wanted the loops to point straight out and look like a bow tie.


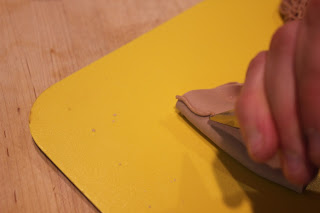
After the pieces were cut and allowed to set for a bit (about an hour), I used a number 2 tip and some brown royal to pipe a basket weave design.


I started with a single line down the side.

 
Then I piped small lines across.

 Then another line down.
 

And alternating lines across....and so on and so forth until the whole thing was covered.


That little nugget above the big one was the practice bow.  It kind of looks like Shredded Wheat Cereal!

Now I let the bow dry over night.

I knew this was going around the bottom tier, so for the top tier, I wanted to include his name.

I saw this fun shape and decided to try and recreate it out of gum paste.


Here is the template I made...


I cut one out in green and a smaller one in a cream color so I could layer them like the invitation.


After they were dry for a bit, I piped his name using extra pressure on the ends of the letters to give them some character.


I then went back over one side of each letter with white straight lines and the other side with a dotted line to make it look sewed!


Looking good.  I got this idea from my buddy Lindy who is an artist and uses this technique in her work...


Here is her blog link.  She makes some really fun art.  I have a few pieces in my house!

http://www.lindyalane.blogspot.com/

Here is the cake all put together....


Sweet!  By the way, this could be a cool idea for Father's Day!  Bow tie cake!!!

A couple of announcements before I go.....

I will be teaching some classes with Cake Central soon.  They are starting a live cake class program that will be traveling to different cities across the US.  This is a link to the info....details will be up soon.

www.cakecentral.com/classes

Here is one of the classes I will be teaching.  It's a one day class inspired by my A Cake Fit for McQueen


It's gonna be fun!...piping, painting, fondant texture, and a hand sculpted skull!

Also, there are couple new classes on Craftsy.com that I want to share.  Click on the pictures to get to the site and receive a discount.


That's all for now.  Don't forget to follow the blog for updates and more fun Fashion Cakes.  Just click the button to the right that says Join this Site.
 
Also, you can follow me on Facebook, Twitter, or Instagram
 
Lastly, I would like to share a picture I took at the IDDBA in Orlando last week...


Aaaahhh!!  The Dough Boy!  He was my idol as a child:) Maybe that's why I was a chubby kid! Ha.


Bye!