Most of my work is inspired by fashion, or at least design outside the culinary world. Yet people always ask me to make a cake that looks like their purse. Why do you want to eat your purse! This blog can be a learning tool for you and an outlet of self expression for me:) No more purse cakes! Enjoy!
Showing posts with label fashion caker. Show all posts

Tuesday, December 17, 2013

Christmas Remix


Okay sorry for the half naked picture...but the Victoria's Secret fashion show was just on and I couldn't resist.  I watch every year.  It's the only time you can watch a fashion show on prime time television!  Everything else is you have to search for on YouTube.

So last year around this time, I was featured on a couple different blogs to promote my Craftsy classes.  I didn't get a chance to post them myself so I thought I would do that this year!

The first one I did was on cake pops.  Here is the recipe.


Christmas Tree and Santa Hat Cake Pops


Ingredients:

5 cups cake crumbs

½ cup icing

24 oz. chocolate (candy melts, red, white, green)

2 tablespoons vegetable oil

Pop sticks

Holiday sprinkles
 
First you will need to crumble the cake into a bowl.
 
Then add the icing and mix.  Keep in mind, all cake is not created equal!  So you may need more or less icing.  Just make sure that you achieve a "cookie dough" texture.


Now form the pops into the shapes you want.  I made spheres and cone shapes.


Then place the shapes in the cooler for at least 2 hours.  From there, I work one or two at a time, leaving the rest in the cooler.  Dip the pop stick in chocolate and then into the cake pop.  This will ensure that the pop stays on the stick while you are dipping the whole thing.


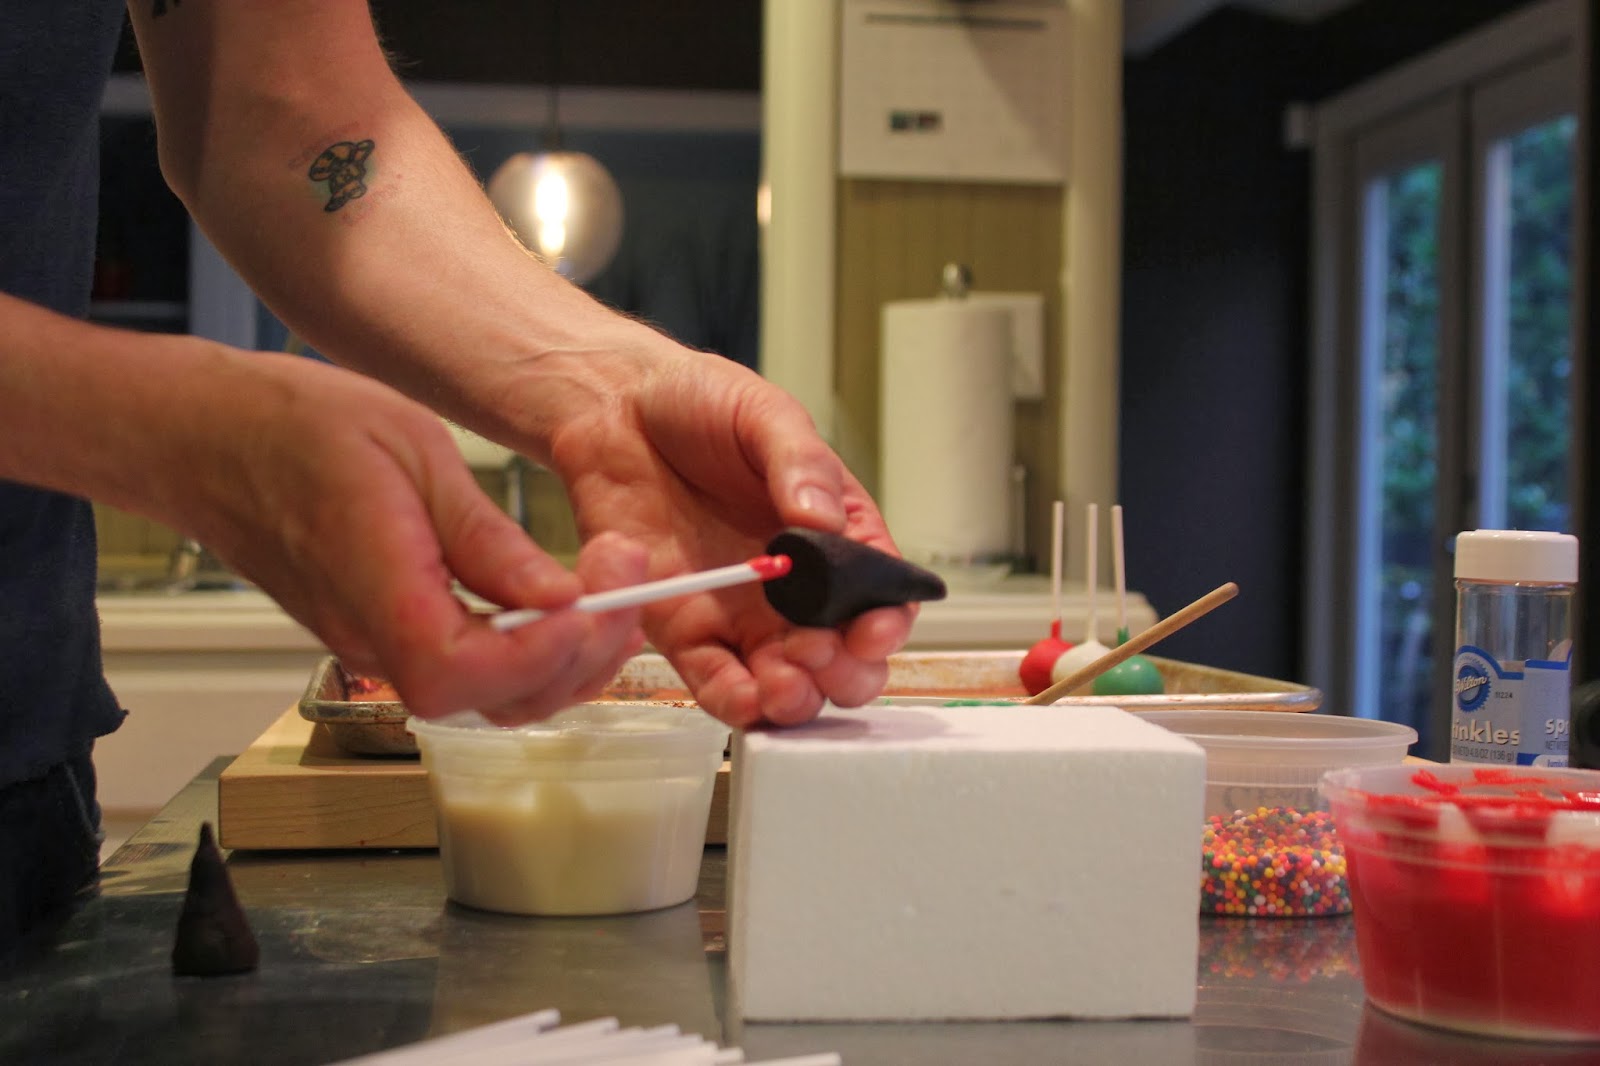
Then dip the pop.  I am using colored candy melts.


If you are making Christmas trees, you will need to sprinkle them before the chocolate sets.  This will give the illusion of ornaments!


Too cute.

 
Here are a couple others I made including Santa and elf hats and ornaments.


I poked holes into a cake drum to stand the pops upright for presentation.


The next one is a project that will help cut costs...cause gifts can be expensive!
 
Edible Holiday Gifts 

As an instructor for Craftsy, it’s my job to teach people techniques that will further their culinary careers and hobbies!  As a friend and family member, however, I am the one who is always required to bring dessert to an event…..and really, I don’t mind.  This is why every holiday season, I not only whip up treats for the parties, I try to make everyone a special gift from my kitchen.  Now anyone can just follow a recipe and hand it over in a decorative tin.  I’m going to show you how to make something unique and also how make it look like it came out of the pages of a magazine.


Decorative Boxes

Packaging can be expensive…..especially around the holidays.  So here is a way to make some customized boxes that are inexpensive, simple and beautiful.


Here is what you need….

1.)      Plain white boxes (Container Store)

2.)      Rubber stamps (you can use whatever design you like but choose one you will reuse often!)

3.)      Ink (these you can find at craft stores….they last a long time)

4.)      Ribbon and bows

5.)      Small name card (to personalize)

6.)      Tape

7.)      Scissors

8.)      Ornaments (optional)


This is super easy.  Just make sure you stamp the boxes while they are flat, let them dry, and then fold them.
 
 
Now to fill the boxes.  These are a couple of my easy recipes. 

Peppermint Bark 3 Ways

·         Peppermint Rice Cereal Treats

·         Swirled Peppermint Bark

·         Peppermint Diamonds


Peppermint Rice Cereal Treats

Ingredients

6 cups cocoa rice cereal treats

6 cups marshmallows (mini)

3 Tablespoons butter

4 to 5 candy canes (crushed)

7 to 8 peppermint patties (chopped)

Additional chocolate and crushed peppermint for the bark and diamonds


·         First you will melt the butter and candy canes over medium heat until dissolved

·         Add marshmallows and continue to stir until melted

·         Add cocoa rice cereal and patties and stir until incorporated

·         Then turn out onto a siplat or parchment paper and spread thin

·         Once this sets we are going to spread chocolate over the top and break it up to look like traditional bark


For the more traditional bark, I just melt dark and white chocolate and drizzle them together on parchment paper.


Then swirl them together with a skewer and sprinkle with crushed candy canes.  Once set, I break them up by hand.


For a variation, I use the remaining chocolate, mixed with crushed candy canes, to place in a diamond mold from Fred and Friends. This is a great site to get a funny gift too!!


Ta daa!!  Now here is an important note.  You will need to place the treats in a plastic bag or liner before placing into the boxes.  This will keep the boxes from getting greasy!


See, gift giving doesn't have to break the bank.
 
Okay here is the last one!
 
 
Chai Tea Whoopie Pies


Pies-

1 ½ cups all purpose flour

1 cup brown sugar

1 teaspoon baking powder

½ teaspoon salt

½ teaspoon baking soda

1 teaspoon ground cinnamon

½ teaspoon nutmeg

2 tablespoons instant Chai Tea

2 eggs

1 stick butter (1/2 cup)


·         Preheat oven to 350 degrees F.

·         Place all ingredients into a stand mixer fitted with the paddle attachment

·         Mix on low until all ingredients are combined

·         With a small ice cream scoop, dish scoops of dough onto a nonstick tray or silpat at least 2 inches apart

·         Bake for 10 minutes
·         Cool


While the pies are baking, you can whip up the filling.
 
Filling-
2 cup marshmallow fluff
2 stick butter
2 teaspoon vanilla
 
Place all ingredients in a stand mixer with the whip attachment and whip on high for one minute.
 
Now let's put them together.


So easy!  These are really good too! 
 
 
Okay that's all for now....more fashion cakes to come!  Subscribe for the latest updates!
 
Bye!!


Wednesday, November 20, 2013

Stephane Rolland inspired

http://www.stephanerolland.com/
Oh Lord, this dress is amazing!  I have been following the work of an incredible designer named Stephane Rolland.  His work is like no other.  His dresses are chic, sculptural, and modern with gorgeous silhouettes and styling.

Here is what Wiki has to say.....

http://www.stephanerolland.com/


At the age of 20 Rolland joined Balenciaga and within a year was promoted to the position of Creative Director of menswear and international licenses. At 24, he left Balenciaga to start his own prêt-à-porter company, which he ran for six years, until he was asked to become artistic designer for the haute couture fashion house formerly owned by Jean-Louis Scherrer, a position he occupied for the next ten years.
Rolland simultaneously worked as a costume designer. In 2006 and 2007, he was nominated for the prestigious Molière awards and became an official partner of the Cannes Film Festival.
On the 2 July 2007, Rolland presented a couture collection under his own name.
Rolland is a full member of the Chambre Syndicale de la Haute Couture and therefore his brand can officially bear the "haute couture" label.


And his work speaks for itself......look.....


Okay this yellow dress makes me want to be a better person.  Seriously!  You have to see the back though....

Here is a link to the show.  It's dress number 27 (there is a counter in the bottom right corner), and she turns around at 8:45.  Can you tell I am bit obsessed!


So that said, I will be doing a post using this dress as inspiration in the future!  But for now, I have a job to do.

Two friends of mine contacted me early in the year and asked me to make their wedding cake.  Julie and Tex....here they are...


Such a sweet photo!  Julie and I used to work together at Highland Bakery.  She was our office manager and had to take countless orders and deal with all the crazy brides;)  So I was very happy that it was her turn to make an order for a wedding cake and not have to take one!


This is her dress...

Gorge!  And the ruffles bring me back to my first point....Mr. Rolland.  I sketched a few designs with his designs in mind....however, this is a wedding.....so I had to tone it down and create a beautiful and sweet cake.

So Julie like the first sketch with multiple desserts.....

 
As you can see the main cake is totally inspired by this look....

http://www.stephanerolland.com/

...but the ruffles would be in more of a heart shape.

Julie was drawn more to the cake in this sketch though, because she likes the idea of entire tiers covered in ruffles....


It didn't matter to me either way.  I wanted to make all of it!!! 

So the design is final and off to work.  Much of the techniques in this cake are things I have shown before so I am going to focus on a couple of the flowers....they are the color pop!

I don't make traditional flowers usually.  I like to make what I call "Fashion Flowers", like in this cake....

 And these....


You probably recognize this cake.  It's a rework of Kim Zolciak's wedding cake.  It's become a popular design!

Any who, the flowers are super easy to make and have a dramatic look.

The larger flowers begin with these spheres on a wire.

 
I cut a round of gumpaste and paint the back with piping gel.

 
Then I adhere the gumpaste to the sphere....


Now I paint that with piping gel and dip it in white jimmies or sprinkles....whatever you call them...


Then I add petals.

 
I cut the same gumpaste round and ruffle the edges with a ball tool....


Done!  I also made then in orange.
 
I don't really like to make filler flowers but I needed something small to create for drama.  Julie had some white cranberry looking buds in her bouquet.  So I decided to make something similar.  I made these little ovals and sprayed them with Ideal Lacquer Spray.  It's a product from Albert Uster and I got it from International Sugar Art Collection. This is where I get most of my supplies...and they will ship!!!


Then I make them each a calyx.


lengthen the edges...


Then define the point with the Dresden tool...


A little piping gel....

 
stab it....

 
And done


Looking good.  Here are the rest of the flowers....
 

I also made some roses and billy balls.

And here is the cake!!!.....


It came out great!  Here are some other shots.....


Thank you to Julie and Tex for letting me be part of your big day!  Also, thanks to Stephane Rolland for your inspiration and beautiful designs!
 
Also a huge thank you to Batter Up Cake Co for the amazing cake stand!!!   Click on the link for the website! 
 
http://www.norfolkbatterupcake.com/hand-crafted-cake-stands.html


So in other news....


I am brainstorming at the moment to create a new class for Craftsy next year.  I wanna know your thoughts!  What do you guys want to see.  You can email me at joshuajohncakes@gmail.com or leave your ideas in the comment box below. 
 
Speaking of Craftsy, you can gift my class Modern Piping to anyone for the upcoming holidays!  Here is the link....
 
http://craftsy.us7.list-manage1.com/track/click?u=a92f158a7021a67edea420266&id=cbd4089c46&e=b8156147f2


Also I wanted to share a photo with you all from Cake Carnival in Kitchener, ON Canada.  It was a great event.  Karen Portaleo and I will be going back next year to teach as well.  I will post it as soon as we know the dates...
 
 
We are so silly.  This was the project!  Super fun.
 
That's all for now!!
 
 
Don't forget to follow me on Facebook for updates www.facebook.com/joshuajohnrussell
 
 
Bye!