Most of my work is inspired by fashion, or at least design outside the culinary world. Yet people always ask me to make a cake that looks like their purse. Why do you want to eat your purse! This blog can be a learning tool for you and an outlet of self expression for me:) No more purse cakes! Enjoy!

Wednesday, August 21, 2013

Oh Chevron!!


Oh the chevron craze.  It seems to be at an all time high.  And I am okay with that.  I think it's chic and fun at the same time.....as long as you don't over do it!

Here is what Wikipedia has to say about the insignia....


A chevron (also spelled cheveron, especially in older documents) is an inverted V-shaped pattern. The word is usually used in reference to a kind of fret in architecture, or to a badge or insignia used in military or police uniforms to indicate rank or length of service, or in heraldry and the designs of flags (see flag terminology). The symbol is also used on highway signs to guide drivers around curves.

And you thought it was started on Pinterest;)  It's actually more symbolic than you think....like signifying rank....


In today's world of design, however, chevron is everywhere!!

Home décor....

 
This comes from my friends company!  DENY Designs...they have some really cool stuff.
 
Cell phone cases....

 
Gas....lol


Even hair!....
 
 
Check out this awesome chevron look from Tom Ford.  I love this!!


I love this vintage fashion piece as well....from McCall's magazine in the 60s


A couple of weeks ago, I was asked by my good friends at Sashay Events here in Atlanta, to be part of a wedding spread to be photographed for editorial purposes.  My favorite!!  I jumped at the chance.
 
 
I can't reveal photos from the shoot at this time.  But once the pictures have been published, I will post them.  I can, however, show you a demo from one of the cakes I created for the shoot.  And guess what....I used chevron;)
 
The theme was Gatsby in the Garden and I knew I wanted to do something structured and organic at the same time.  I pulled some inspiration from Jessica Harris' Craftsy class....
 

It's a great class!  Here are some pictures of her work....


Pretty good right?  She really has a great eye for design and all of this is done by hand!

Obviously I am not going to show you her process, you will have to buy the class......it's well worth it!  But I will show you the product I used to get the chevron effect.

They are called Silicone Onlays and are the latest creation from Marvelous Molds.  Now the company has video tutorials on their site and YouTube.....but I'm gonna show you through pictures.


So they come in many different styles and patterns and they are super easy to work with.  Here is the first practice one I made with the Moroccan lace onlay.....
 

It came out pretty good.  You are told to use gumpaste because it is firmer than fondant.  But I did this one with Fondarific and it was fine.

First you have to roll a strip that will fit the size of the mold.  I used the pink roll guides on the Wilton set or you can take it down to a 4 on a pasta machine. 


You place the strip over the onlay (it's good to dust it with a bit of cornstarch first), and press the paste in with your fingers.

 
Then I took a cell pin and gently rolled it over the Onlay until I could see the green edges thought the paste.  This is how you know that the lines have been cut.


I paint the back with some piping gel.


I used a needle tool to take out the excess pieces to get the negative space.


Then secure it to the cake.


I also used light pressure with a fondant smoother to secure the paste.


 Pull away and you are done.

 
 You can see the tiny starting line.  That's because I pressed a bit too hard!
 
 
You could do it this way too....


 I also went back and painted every other one gold.

 
Okay....now we have the structured part.  We need something organic.
 
A friend of mine Alexandria Pellegino from Cake Opera Co. gave me this inspiration!  Her work is remarkable.  Here is the piece that I was inspired by....
 
It's the blue one.

I'm gonna build a croquembouche! Here's what Wiki says....

A croquembouche or croque-en-bouche is a French dessert consisting of choux pastry balls piled into a cone and bound with threads of caramel.
In Italy and France, is often served at weddings, baptisms, and first communions.

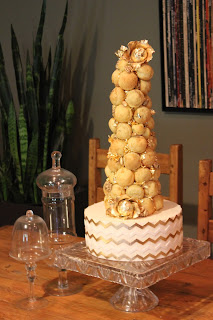
I learned how to make this in college.  But I am going to break the rules a bit.  Because this is a photo shoot and not for a real party, I am going to leave the puffs empty so they will not be so heavy and glue them with white chocolate.


I add them one at a time to the cone.  Also, I coated some nuts in gold and used gold leaf to fill in the gaps.


and then a couple gold gilded flowers for some drama!


And here she is....


Yay!! 

I am coming to Dallas to teach in October here are the classes and the links.  It's three classes over two days for $800 or you can take the full day for $400 or a half day for $200.  It's a pretty good deal and it will be lots of fun!! 


This class will explore different styles of modern decorations (fashion inspired of course) including the same style flower I made in this post!


The Gothic Glam class is a take on A Cake Fit for McQueen.  We will hand make the skull and hand cut the bone work on the top tier...then piping!!


Lastly, this class will explore how to make your own template for a framed plaque.  We will also be adding texture and piping!!


That is all for now.  Here is a link to Marina Sousa's new class on Craftsy.  It's really good!!


Don't forget to follow the blog for updates.  Bye!!


Tuesday, July 23, 2013

Faberge Spider Cake


For some reason I gravitate toward images that are hauntingly beautiful.  Maybe that's why I love Alexander McQueen so much.  But there is another designer whose work fascinates me.....Gareth Pugh.  Here is some of his other work....


Trust me, there will be a blog post on his designs in the near future.  I am showing you this because the theme is where I drew my inspiration for my latest cake.

I was asked by Cake Decoration Heaven to create a cake inspired by the Autumn season.  I immediately wrote back and asked if I could make a cake with Halloween in mind.  They agreed and let me go crazy.

So what to make?  There are a million different ways to portray Halloween.......

Cute....


No...too cute....it's not right for this.


Elegant....


Okay this is nice.


Creepy....

 
Aaah!  I think this baby is drunk.


Funny....


See baby....this is what happens when you drink too much!;)


Down right scary....


These pumpkins were created by Ray Villafane.  He is a master sculptor and his work is amazing!  But I think this is too much for my project!

And lastly.....there is always Halloween the Martha Stewart way.....

Girl you got a bug on your face.

But speaking of bugs, this is were I found my inspiration!!

I remember watching an episode of America's Next Top Model a few years back.  The models were asked to walk the runway wearing jeweled studded hissing cockroaches!


Yikes!  The bottom picture is an ornament but the one that the model is holding, is real!  It was a trend for a minute or two, created by Jared Gold and sold for $80 a pop.  I'm not sure I would pay $80 for a roach......especially since I kill them for free!

Okay all joking aside, I decided to created an elegant (Martha Stewart worthy) cake using a spider.


I started by creating the spider from gum paste.  I formed the body and head and all of the leg joints separately.  This way, I can secure her to the cake in any way I want.


I decided to cover the top and bottom tiers in white and clear sprinkles and sanding sugar to give the cake a glistening effect.


And the middle tier, was crazy!!  Why I chose to do this.....I have no idea!!!


Ugh, so it came out great, but took a really long time.  I used an extruder and gum paste to pipe out all of the pieces and then wind them around each other forming this cool design.  For a real cake, it's not practical.  But for editorial work, it's super dramatic!!! 

Now let's start on the spider....


I began with the front....gluing the body, head, and the first two legs with white chocolate in a paper cone.  I placed her arms like this for a reason.....you will see in a bit.


 Here is a closer view. 


So on and so forth until the whole spider was on and secure.  Chocolate is a must for gluing her down.  If you use royal, you will have to hold or brace each piece while it dries.  That would take a longer time than you want.


Here she is all together. 


Now I want to make it look like the spider is decorating the cake.  So I am going to add some string work.  And by that I mean I will take a 2.5 PME tip and pipe a ton of strings on top of one another to give an ode to the spider's web......


It came out pretty cool.  I want it to pop though, so I will paint the strings gold.  A spider that spins gold?.....what could be more elegant?;)


I also added some detail work on the spider including a jewel on her back and some piped pearls....


Now here is where my OCD steps in.  I wanted to give the editor options so I took final shots in white....


Then in green....


And again in black....


Now you can see the strings up by her hands.  I placed them that way to give the illusion that she is decorating the cake.

So the magazine is out and I am thrilled to have a two page spread.....complete with step by step instructions.  Click the cover to download a copy.....it's reasonably priced and the issue is full of ideas!!


Oh and here is some super exciting news!!!  I will be featured in the next issue of Grace Ormonde!!  I have dreamed of being in that magazine since I was in culinary school.  It hits news stands in February.


Okay the picture is super small but I am just grateful to be included!!  Here is a larger shot of the cake that they used....


Yay!  When I got the email I almost died.  They also decided to use my McQueen cake for their June digital issue....


Double Yay!!

So don't forget, if you want updates, subscribe to the blog on the right side of the screen.  That toolbar is where you can find links to my classes on Craftsy.  Also, you can follow me on Facebook, Twitter, Pinterest and now Instagram.

Here is my latest Instagram pic....


They are homemade Oreo ice cream sandwiches!!  What??!!

Thanks to Cake Decoration Heaven for including me in the magazine.....and allowing my personal creative freedom.....and to Grace Ormonde for fulfilling a childhood dream.  And to Craftsy for letting me be part of the family!!

Oh and feel free to leave comments with questions or other ideas you would like to see.

Last thing... here is a fun cake I made a couple week ago. 


That's all for now!